Questions?
Mission Editor
XPForce
XPForce is available for 32-bit and 64-bit Windows, and is currently in testing for 64-bit Linux. Please see the Linux information page for full details.
Mac support is planned but has no timescale right now.
So far, it has been tested on:
- Microsoft Sidewinder Force Feedback 2
- Logitech G940
- Logitech Force 3D Pro
- Iris Dynamics Yoke
Do you use something else successfully? Please let me know!
XPForce will send Force Feedback commands to any joystick that Windows recognises as supporting forces. You don't necessarily need customised drivers to do this - for example, the old Microsoft Sidewinder Force Feedback 2 works happily on Windows 8.1 and newer despite only using Windows' built-in drivers.
If your joystick doesn't have motors built in to provide force feedback, there's no way that XPForce can send them any commands! Please check before buying that it's compatible with your joystick, and that your joystick does in fact have force feedback capability.
Some sticks do seem to need "official" drivers rather than the standard Windows ones. Even if it works just fine as a standard controller, the force aspect might not work if the drivers are incorrect. Check that your stick is fully supported by running "dxdiag" - you should already have it installed as part of DirectX. Click on the "Save All Information" button and it will create a text file. If you open that file, under the section for your joystick there should be several entries like this:
FF Driver: C:\Windows\System32\pid.dll
FF Driver Date: 10/30/2015 07:18:09
FF Driver Version: 10.00.10586.0000
FF Driver Size: 45568 bytes
If it says "FF Driver: n/a" then there's definitely no force driver installed, so please visit the manufacturer's website and try to find the correct drivers.
You can also try the "DirectX Force Test Program", available for free from https://www.fsmissioneditor.com/downloads/ . This will let you simply select a controller and send individual commands to it. If your stick shows forces in the test program but not in X-Plane then please get in touch. If the Force Test program also doesn't list your controller, or the forces don't work, then it's either a driver or a hardware problem.
Finally of course, you can try using any other force-enabled game you have.
XPForce is coming to Linux!
The plugin adds force-feedback support to X-Plane 9 and higher and will soon be available for Linux - despite the current problems with Linux and force-feedback drivers! If you would like to be involved in pre-release testing then please contact us at support@fsmissioneditor.com .
Installation
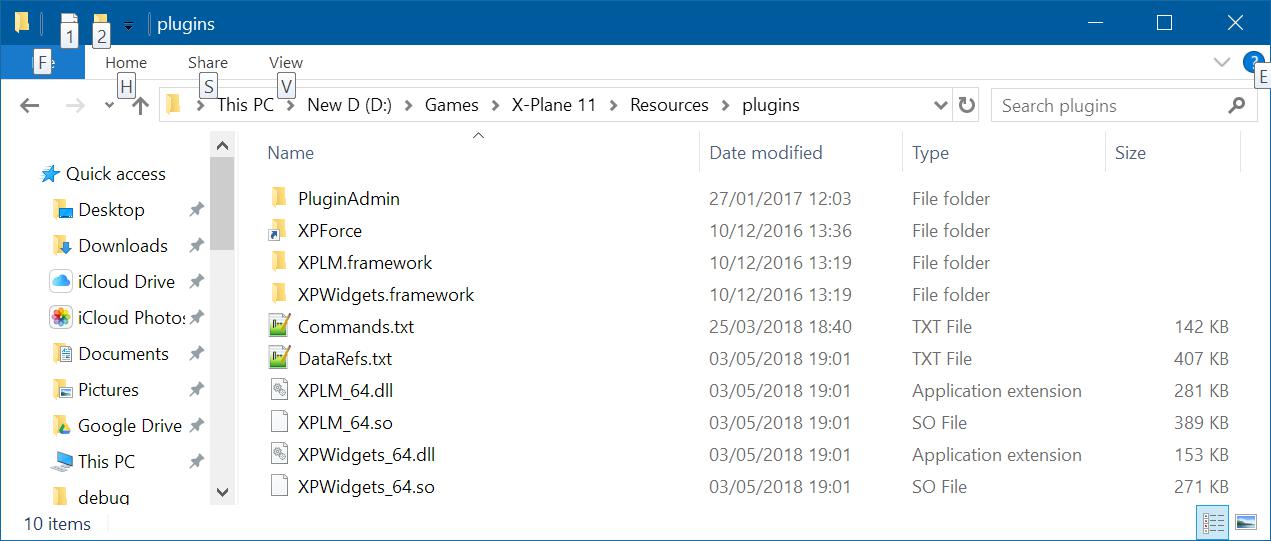
The plugin itself is very easy to install. Simply download the zip file and extract it to your "X-Plane/Resources/plugins" folder. Start X-Plane and the plugin will be picked up automatically.
Supported Controllers
At present the Linux version of XPForce is experimental, given that the underlying drivers are very limited.
- Microsoft Sidewinder Force Feedback 2 works, but only if you apply the patch here and rebuild the kernel driver yourself. At present only one part of the patch has been accepted into the linux kernel, which means that for the forseeable future the standard driver will remain unusable without patching.
- Iris Dynamics Yoke does not work - but I'm looking at fixing this one. This will use the same driver as the MS Sidewinder and so will need the same patches applied. There are also yoke firmware changes required as of Feb 25th 2015.
- Logitech devices do not work. The Linux driver supports only "Rumble" and "Constant Force" effects, which XPForce does not use. It looks like it's only aware of wheel-type devices at present. However, it may be possible to extend the driver fairly easily but since I don't have a Logitech force-enabled joystick to test with it's not something I can easily do. It may also be possible to use the generic driver that works with the Iris Dynamics and MS Sidewinder controllers - but that means building it yourself...
If it's any consolation, Mac support for force-enabled controllers is even worse!
Linux Setup
Preparing the Linux system to work properly with force-feedback joysticks is considerably more complex than in Windows, where it is ready to use as soon as it is plugged in. To send force-feedback commands to the stick, a special filed called a "device node" must be set to read-write To do this, you need to know the name of the device. Unfortunately this name can change frequently, and the read-write setting can be lost if you unplug the joystick or reboot. Your Linux distribution may set all this up for you.
Find your joystick's device node
All of the following commands should be run as the root user. The method for doing this varies between Linux distributions, but will typically be "sudo" or "su -c".
# lsinput | more
This will give you lots of text on screen depending on how many input devices you have. You need to find the one that matches your joystick. The example below shows the entry for the Microsoft Force Feedback 2:
/dev/input/event4
bustype : BUS_USB
vendor : 0x45e
product : 0x1b
version : 256
name : "Microsoft SideWinder Force Feedb"
phys : "usb-0000:00:1a.0-1.4/input0"
uniq : ""
bits ev : EV_SYN EV_KEY EV_ABS EV_MSC EV_FF
The device node for this joystick is "/dev/input/event4". This may change on reboot, or if you unplug the joystick!
Test the Linux kernel force-feedback support
Again as root, run the following command to test the forces on this device. Use the correct device node name that you found.
# fftest /dev/input/event4
If the joystick is supported in Linux, you will get the following text displayed:
Device /dev/input/event4 opened
Features:
* Absolute axes: X, Y, RZ, Throttle, Hat 0 X, Hat 0 Y,
[63 00 03 00 00 00 00 00 ]
* Relative axes:
[00 00 ]
* Force feedback effects types: Constant, Periodic, Ramp, Spring, Friction, Damper, Rumble, Inertia, Gain, Autocenter,
Force feedback periodic effects: Square, Triangle, Sine, Saw up, Saw down,
[00 00 00 00 00 00 00 00 00 00 FF 1F 03 00 00 00 ]
* Number of simultaneous effects: 40
Setting master gain to 75% ... OK
Uploading effect #0 (Periodic sinusoidal) ... OK (id 0)
Uploading effect #1 (Constant) ... OK (id 1)
Uploading effect #2 (Spring) ... OK (id 2)
Uploading effect #3 (Damper) ... OK (id 3)
Uploading effect #4 (Strong rumble, with heavy motor) ... OK (id 4)
Uploading effect #5 (Weak rumble, with light motor) ... OK (id 5)
Enter effect number, -1 to exit
Note the "OK" messages after "Uploading effect". If the Linux joystick driver is broken, you will instead get "Error: Function not implemented". In current Linux kernels, the driver for the Microsoft Sidewinder Force Feedback 2 is broken. However, I have created a kernel patch which can be used to fix this driver, and will hopefully make it into the Linux kernel soon. Please see the "Patching Linux to support Force Feedback" page for instructions.
Enable force-feedback support for non-root users
As a non-root user, try the "fftest" program again. If you still get the "OK" messages and the forces work then you are ready to start X-Plane! If you get "Open device file: Permission denied", then there are more steps you need to follow.
Every time a new device is plugged in, including when you reboot, it is set up automatically by Linux. If you get "Permission denied" as a normal user then Linux is not setting it up correctly. To fix this, you need to add uDev rules to force the joystick to be set up as read-write for all users.
Again using the device node name you found, and as root, use this command to find the joystick's manufacturer and product codes:
# udevadm info -an /dev/input/event4 | grep -E "idVendor|idProduct" | head -2
ATTRS{idVendor}=="045e"
ATTRS{idProduct}=="001b"
Now create a new file in /etc/udev/rules.d called "99-XPlane_Joystick.rules" . You will need to be root to do this. Edit the file to contain the following line, changing the codes for "idVendor" and "idProduct" to match the ones printed by udevadm.
KERNEL=="event*", ATTRS{idProduct}=="001b", ATTRS{idVendor}=="045e", MODE="0666"
Save the file, then unplug and reconnect the joystick. Re-run the steps above to find the device node since it may now be different. Re-run fftest using the new device node name.
Currently (February 2015) the Linux kernel support for PID devices such as the Microsoft Sidewinder Force Feedback 2 is broken, and has been for several years. During the porting of XPForce to Linux, I have fixed several bugs in the kernel driver and am happy to say that it is now fully working. Of course, until that patch makes it into the kernel, you will need to apply the patch yourself.
The following two links are for bug reports, and the code of the patch, for Redhat-based and Debian-based systems respectively. The patch is identical, but you may want to add yourself to the mailing list to get any updates as they happen and to show the maintainers that there is some interest in getting the SWFF2 working under Linux.
- https://bugzilla.redhat.com/show_bug.cgi?id=1092182
- https://bugs.launchpad.net/ubuntu/+source/linux/+bug/1035723
You should be comfortable with the process of downloading and building a kernel, and in particular, of how to recover if it goes wrong. The steps below are a rough description of how to complete the process but are undertaken entirely at your own risk. I will under no circumstances provide free support for this process, nor for recovering your system if it goes wrong. In rebuilding the kernel or associated modules you run the risk of making your Linux system unusable. With all due respect to the Linux fundamentalists, if you're going to run it as a desktop system then you have to realise that underneath the desktop gloss it's a complex, Unix-like server O/S and sometimes needs to be treated as such.
- Locate the correct device node for your device (as root):
# lsinput | more
Scan the output for the device node matching your joystick:
/dev/input/event4
bustype : BUS_USB
vendor : 0x45e
product : 0x1b
version : 256
name : "Microsoft SideWinder Force Feedb"
phys : "usb-0000:00:1a.0-1.4/input0"
uniq : ""
bits ev : EV_SYN EV_KEY EV_ABS EV_MSC EV_FF
The device node for this joystick is "/dev/input/event4". This may change on reboot, or if you unplug the joystick! - Test the device using the "fftest" program, either provided or available for most Linux distributions as part of the "joystick" package.
> fftest /dev/input/event4
If you get the "Error: Function not implemented" message after "Uploading Effect" and you're sure that you're looking at the right device node then you probably do need to patch your kernel. - Get your source tree. Full instructions for getting, preparing and building for Fedora and Ubuntu can be found at the following locations. Other distributions should have similar pages.
- https://wiki.ubuntu.com/Kernel/BuildYourOwnKernel
- https://fedoraproject.org/wiki/Building_a_custom_kernel
There is no need to build the full kernel, just get and prepare the source. The aim is to only change two modules rather than install a full custom kernel. Read the documentation provided by your Linux distribution if you don't know how to do this already. The following steps prepare the source tree for building modules on recent versions of Ubuntu - your distribution may well need different steps:
> cd wherever_the_source_was_put
> cp /boot/config-`uname -r` .config
> cp /usr/src/linux-headers-`uname -r`/Module.symvers .
> make oldconfig scripts prepare - Build the existing USB HID modules just to make sure everything's in place and set up correctly.
> make SUBDIRS=drivers/hid modules - Download and apply the patch. The latest patch is attached at the bottom of this page.
> patch -p1 <swff2.patch - Rebuild the changed modules.
> make SUBDIRS=drivers/hid modules - Test the new modules as root. THIS MAY MAKE YOUR MOUSE AND KEYBOARD STOP WORKING TEMPORARILY!
# rmmod hid_generic usbhid hid; insmod drivers/hid/hid.ko; insmod drivers/hid/usbhid/usbhid.ko
If you lose your mouse and keyboard then unplug one of them and plug it back in. Within a few seconds you should get them both back, because Linux will load the normal, unchanged driver modules. If not, reboot. - Locate the device again (see step 1). It may have changed.
- Try "fftest" again (see step 2). You should now get "OK" responses to the "Uploading effect" and the effects will work when you start them.
- If you're absolutely, positively, 100% sure that it's all working including other USB devices, copy the new modules into place as root:
# cp --parents drivers/hid/hid.ko drivers/hid/usbhid/usbhid.ko /lib/modules/`uname -r`/kernel/ - Update your boot image as root. This contains a second copy of the kernel modules and is used when you first boot. If you don't update this then you will still keep using the original, unchanged modules even though the new ones are in the correct place under /lib/modules/ .
# update-initramfs -u - Remember that if you update your kernel you may well need to run through this process again.
When a new version is released, simply download and install it in exactly the same way as you did with the original version. Please check that you are still entitled to free upgrades before you install! You can do this on the helpdesk by logging in and selecting the "Licenses" option. If you installed using the Windows Installer (MSI) package, there is no need to remove the old version first.
The plugin can check for updates both manually and automatically. If an upgrade is available it will tell you whether your free upgrade period has expired.
First, find your X-Plane installation folder. The XPForce logfile is in the "Output" directory, called "XPForce.log".
If you have had a crash which X-Plane says is caused by XPForce, please also send the X-Plane log. This is in the X-Plane installation folder, called "Log.txt".
All of them!
While it is possible for aircraft to come with predefined forces, it seems that this is almost never done. XPForce calculates the required forces itself, based on the characteristics of the individual aircraft. Neither the aircraft designer, nor you, need to alter the aircraft.cfg to "support" forces.
All X-Plane plugins need to be put inside the "plugins" folder:
EVA (Elite:Dangerous Virtual Assistant)
EVA works, as do many of the third-party Elite:Dangerous tools, using Frontier's "Companion App" web interface. This was originally designed for Frontier's own iOS companion app. To use this interface, you need to tell Frontier's servers who you are so that they can send back the right CMDR data; to do this, you must log in using your Frontier account.
So how do you know you can trust EVA with your account details?
The "Marketing" Answer
EVA does not use your Frontier account details for any purpose except logging in to Frontier's servers. Specifically, your email address is not transmitted outside the app at any time, except to Frontier Developments over an encrypted channel. Your password will be stored using the secure storage facilities provided by either iOS or Android, if and only if you request it to be stored using EVA's settings.
You can choose to use EVA without providing any account details at all, but you will be limited to using it as a trade computer. In other words, if you choose not to tell Frontier's servers who you are, they will not be able to give you any information back.
The "Practical" Answer
The only way to be absolutely 100% certain that a piece of software is not doing things you don't want is to only use software you downloaded from inside your own skull on a computer which has never been connected to any outside source whatsoever. This is true for all software, from all sources, and I know it's not reassuring.
Governments, banks, major corporations and even intelligence agencies have both software and servers hacked with regularity. Even on this level there is no 100% certain guarantee of safety. If you're asking how safe it is to use private account details in a third-party tool, you're right to do so.
So what can I say to reassure you?
Ask yourself what "the thief" would stand to gain from stealing your Elite login. There's no credit card details stored at Frontier, and if someone else were to start playing with your account you would see very quickly that your game details had changed, contact Frontier to report the theft, and change the password back.
Ask yourself what "the thief" would stand to lose, if caught. EVA is only available through the Apple App Store and Google Play Store. Both of these require a full registration, including postal address. Apple requires business details to be validated too. If EVA were found to be stealing account details deliberately, it would be the work of minutes for investigators to find me. EVA is written by a registered software development company, with interests in other areas beyond Elite:Dangerous, including contract development within the games industry; I would stand to lose my reputation, company and livelihood. EVA is a paid-for application; this means that both Apple and Google have my company bank details too. Between Apple, Google, the UK government, Companies House, HMRC and the bank, someone somewhere would be able to track me down quickly enough if EVA were doing anything illegal.
Ask yourself if you would take that kind of risk, for that level of reward, if you were in my position.
EVA is not able to fully work if you have an XBox account for Elite:Dangerous. This is because of limitations on Frontier's servers, which see XBox accounts as entirely different to PC/Mac accounts. As a result, they aren't able to provide the details that EVA needs - your location, your profile and the current station's market.
EVA is still able to work as a trade computer, but will need to have the database of systems, stations and prices updated occasionally (using the Nav tab).
At the time of writing, the Playstation edition of Elite:Dangerous has only just been released. It is currently not known whether EVA will be able to work fully with the Playstation version, but I would assume that it will be restricted in the same way as the XBox version is.
The first time you run EVA, you will need to enter your Frontier account details if you play Elite:Dangerous on PC or Mac. This allows EVA to talk to Frontier's servers to get your profile information.

Enter your account email address and password into the boxes and tap "Login". If this is the first time you've logged in, you'll next need to enter an authentication code, just like you did for Elite:Dangerous itself. This will be emailed to you by Frontier, and usually arrives within a few seconds.
Next, type the authentication code into the "Auth Code" box in EVA, and tap "Authenticate".
Important!
Wait for the authentication code to arrive without cancelling or logging in again. Each authentication code is valid for only the exact login attempt that requested it, so if you try to log in a second time then any authentication code sent for the first login will no longer be accepted.
Yes, EVA can be used with multiple accounts!
If you open the settings page in EVA, you will have two logout options.
Quick
A quick logout just closes the session with Frontier's servers, allowing you to log in with a different account. Remember that you will need to authenticate each account the first time you use it with EVA.
Full
A full logout also removes the authentication details, so Frontier's servers will ask you for authentication if you log in with this account again.
If you own more than one ship in Elite:Dangerous, EVA is able to show you the details of each ship. There is a small catch, though.
The information received from Frontier only gives details of your current ship. This means that EVA is only able to show details of other ships if you have flown that ship while EVA has been running. EVA remembers your ship details and will use those if you ask to see the modules and loadout of one of your other ships.
The locations of all of your ships are always shown correctly.
EVA works entirely standalone - all you need is an account with Frontier.
If you are playing Elite:Dangerous on a PC or Mac, you can help EVA out by installing EDProxy by westokyo . This is a free tool which broadcasts your current location to anything that's listening on your local network. EVA uses this information to get updates on your location much more quickly than it can by asking Frontier's servers. It can be very helpful if you are doing many system to system jumps in a row, because the information received from Frontier can be out of date and can skip some systems.
EVA is able to send your travel logs to EDSM (the Elite:Dangerous Star Map), and prices to EDDB (Elite:Dangerous Database), so you don't need separate tools to do these jobs.
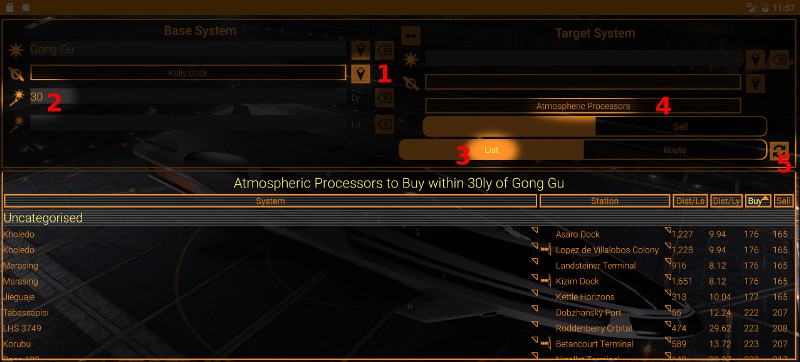
- Go to EVA's trade tab and find the system or station that you want to use the the center of your search. Normally this will be your current location, so tap the map marker icon.
- Enter a maximum range in light years for your search in the box on the left labelled "Ly".
- Select List mode
- Choose the commodity you're interested in from the drop-down list of commodities.
- Tap Search.
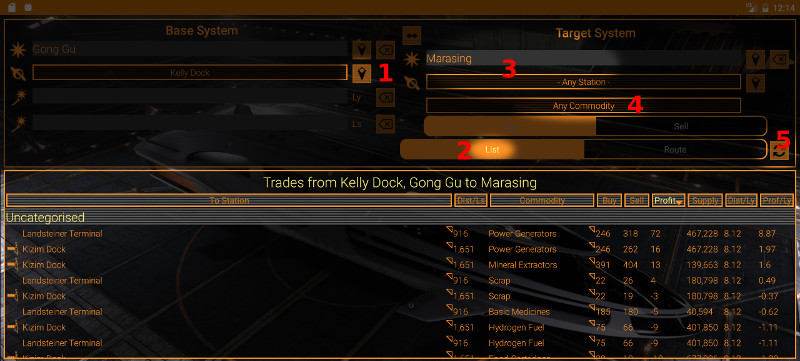
- Go to EVA's trade tab and find the system or station that you want to use the the center of your search. Normally this will be your current location, so tap the map marker icon.
- Select List mode
- Choose the system or station you want to find a trade to. The system name will show an auto-complete list once you've typed in 4 or more letters.
- Choose the commodity you're interested in from the drop-down list of commodities, or set it to "Any Commodity" to show all possible trades.
- Tap Search.
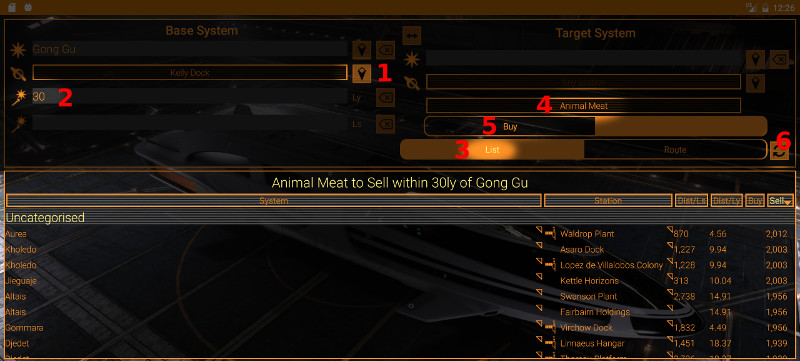
- Go to EVA's trade tab and find the system or station that you want to use the the center of your search. Normally this will be your current location, so tap the map marker icon.
- Enter a maximum range in light years for your search in the box on the left labelled "Ly".
- Select List mode
- Choose the commodity you're interested in from the drop-down list of commodities.
- Choose whether you want to buy or sell the commodity.
- Tap Search.
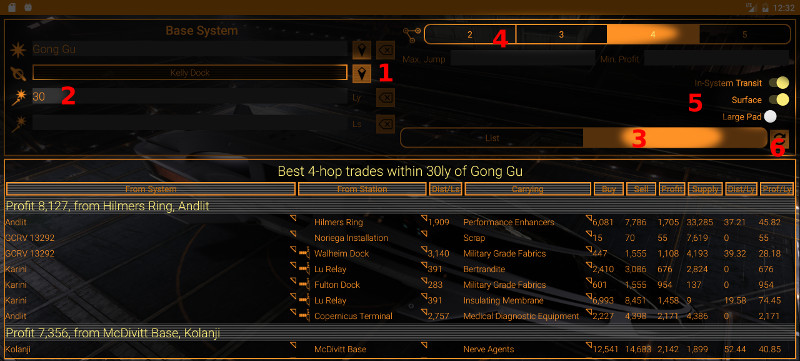
- Go to EVA's trade tab and find the system or station that you want to use the the center of your search. Normally this will be your current location, so tap the map marker icon.
- Enter a maximum range in light years for your search in the box on the left labelled "Ly".
- Select Trade mode
- Choose the length of the trade route
- Set any other conditions - longest jump range, smallest profit, whether you are willing to transfer between stations in the same system without any cargo, if you want to go to surface stations and whether you need a large docking pad.
- Press Search.
EVA will take notes for you in various ways.
System Notes
If you want to store a quick note for a particular star system:
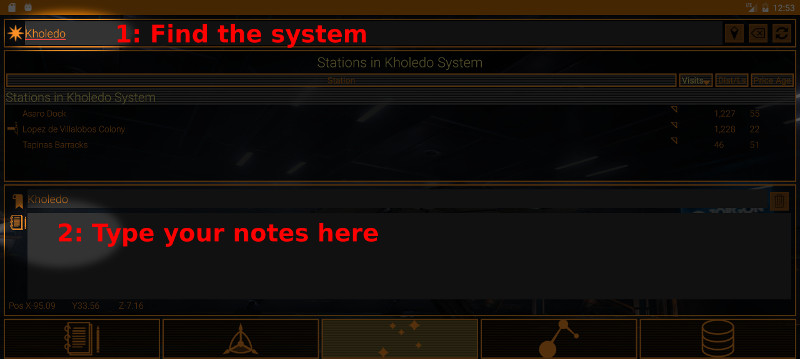
- Go to the Nav tab and find the system you're interested in.
- Use the map marker button to automatically get the system you're currently in, or
- Type part of a system name in and search, then double-tap on the system name in the list of results.
- Type your notes into the Notes box.
EVA will read these notes back to you each time you re-enter this system, if this option isn't switched off in the settings. They will also be sent to EDSM if you have given EVA your EDSM API key in settings.
EDSM (https://www.edsm.net/) is the Elite:Dangerous Star Map. It keeps track of your progress across the galaxy, but needs to be told where you are by a program like EVA. If you create a free account with EDSM, you will be given an "API Key", which EVA can use to communicate with EDSM.
EVA and EDSM can exchange records about your location, and any notes you take for specific star systems. It has many other fun features, like a public map of where CMDRs are right now, sharing a map of your flights with others, and showing your current ranks.
EVA can take some time to update prices after you dock at a station. There are two reasons for this, one of which is easily fixed and partly helps to fix the other.
The first problem is finding out that you've docked. Remember that EVA gets no realtime data from Elite:Dangerous itself, it relies on getting information from Frontier's servers and it has to ask for it. You can set EVA to check automatically every 30 seconds but no more often than that, to avoid overloading Frontier. This can be one source of delay.
This sounds as though it would be easily fixed by installing and running EDProxy on your PC or Mac. This gives immediate notification whenever you enter a new star system. Unfortunately it doesn't give notification when you dock, although there may be options in the future to help that.
In the meantime, the workaround is very easy; all you need to do is tap the "Refresh" button soon after you dock.
The second problem is that even after you do this, sometimes the prices don't update immediately. The issue here is that sometimes Frontier's servers are a little way behind the current state of the game. In fact, sometimes the information reported by Frontier actually goes backwards to a previous system! EVA filters all this out, but there is nothing EVA can do to force Frontier to update their server state.
Updates in Elite:Dangerous 2.2 have made it potentially easier to get realtime updates, once EDProxy has been updated to match. When this happens, EVA will get updated to react to docking too.
When you log in to EVA for the first time, it will need to be authenticated by Frontier. This is to make sure your account details are kept safe.
Frontier will email you with a five-letter code which you need to type into EVA before Frontier will send out any more information. Each authentication code is only usable once, and matches only one login attempt. This means that if you log in twice without authenticating, the first authentication code you receive will no longer work. The codes can take a few minutes to arrive, so if you log in again during that time then you must wait for the second code to arrive.
If you want to make sure that you're using the right code, the easiest way is to just wait a couple of minutes to check that a second code doesn't arrive.